How to set up Facebook advertising for your nonprofit organization
Facebook continues to lead the way for the number of unique monthly users at an almost 3 to 1 ratio over its next closest competitor. With this level of popularity, Facebook has been and continues to be the social media platform of choice for many nonprofit organizations. With a historic organic reach of over 16% for posts, this platform held a relatively low friction way of engaging our communities.
That has all changed. With new algorithms that determine the organic reach for organizational pages it has become increasingly difficult to reach our audiences. That 16% reach has been reduced to a little over 5% reach and organizations are struggling to connect with their fans in a meaningful way.
Due to these changes, there is a new emphasis on paid advertising on Facebook. But how do you reach your audience in a targeted and on-budget fashion?
This post will walk you through the basics of advertising on Facebook. The different objective, targeting, and budget options will be explained so that you will have a better understanding of how this advertising platform works and allow you to confidently begin your own Facebook ad campaigns.
Getting started with Facebook advertising
There are two options for creating ads on Facebook – the easy to use Ads Creation interface, or the more advanced level Facebook Power Editor. For users new to Facebook advertising I am going to recommend using the ads creation option which can be found by visiting the following link: www.facebook.com/ads/create.
When starting your campaign, you’ll need to have three things in mind:
1) What is the objective of your campaign?
2) Who do you want your ads to reach?
3) How much do you want to spend?
Thankfully, these steps are laid out clearly in the ad creation process and you will be able to follow along without much confusion in the process.
Choosing your objective
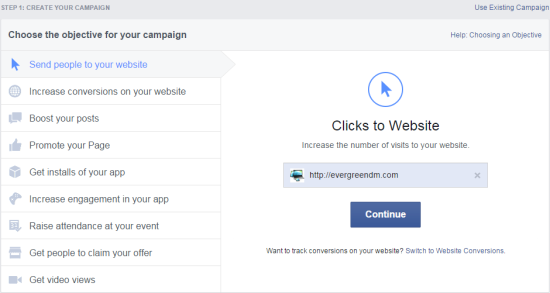
In the above screenshot you can see that Facebook clearly outlines the 9 predetermined objectives for ad campaigns. These objectives are:
Send people to your website
- Focus of this objective is to simply drive traffic to your organization’s website.
- When creating ads for this objective you will have the option of adding a “call to action” button.
Increase conversions on your website
- For the conversions objective you will be required to create a Facebook ‘conversion pixel’. This can be accomplished by visiting the ‘Conversion Tracking’ page within your ‘Manage Ads’ section of Facebook.
- Once the pixel is added to your site you will be able to optimize your ads for donations, newsletter sign-ups, or other actions you would like your visitors to take.
Boost your posts
- Use this objective if you would like one of your Facebook posts to reach a wider audience.
- This is the best way to drive deeper engagement with your posts.
Promote your page
- This is how you would advertise to get new ‘Likes’ on your page.
- With the increasingly limited organic reach of your posts this may not be the best way to spend your advertising budget on Facebook.
Get installs and increase engagement of your app
- A good way to get new users to download your app – if you have one.
- Most nonprofits do not have apps, so this will not likely be a priority.
Raise attendance at your event
- This is an easy way to promote your events to a targeted audience.
- Your ads will also show the number of people who have confirmed they are going through Facebook which will help you increase engagement.
Get people to claim your offer
- If your organization has free items to give away you can promote them on Facebook; this could be tickets to fundraising events, branded swag items, or anything else that will engage your audience.
- Getting creative with this may be a way to drive further engagement.
Get video views
- Relatively new to Facebook ads, you are now able to promote your videos.
- Regular Facebook users will have noticed an increase of videos in the newsfeed, using this objective will help you compete.
Setting your target audience
Choosing your target audience is key to a successful campaign. Once you start setting targeting parameters for your campaign the arrow on the right will move between broad reach, targeted, and specific, and will also give you an estimated potential reach for your ads.
Your options for audience targeting include:
Location
- You are able to geographically target your audience by Country, Province, City or Postal Code.
Age and gender
- You can determine which demographic targeting to apply to your campaign.
Languages
- Leave this blank unless the audience you are targeting uses a language that is not common to the location targeting you have set.
More demographics
- In this drop down menu you’ll be able to further demographically target your audience based on items such as relationship status, level of education, career, politics and more.
Interests and behaviours
- Target your audience based on their interests and behaviours they have displayed on Facebook by liking pages, activities, and which devices they use.
- Interest based targeting allows you to reach specific audiences by looking at their interests, activities, the Pages they have liked and closely related topics.
- Behaviour targeting reaches people based on purchase behaviors or intents, device usage and more.
Connections
- Reach people who have a specific kind of connection to your Page, app or event.
- This will narrow your audience to include only people with that specific connection who also meet the other targeting categories you’ve selected.
Setting your budget
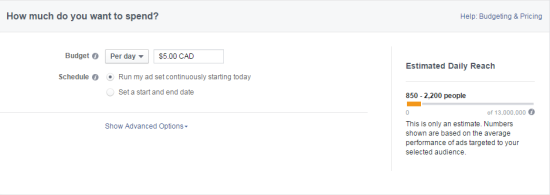
Setting your budget is arguably the most important step. Choosing your objective and target audience are important, but finding the correct balance between cost and reach is key to getting the most out of your marketing dollars. I recommend starting at the bottom end of your daily budget range and slowly increasing that amount if you need to reach a larger audience.
Your estimated daily reach will be displayed on the right hand side of the page so you know roughly how many people will view your ads.
Budgeting options include:
Budget
- Set your budget based on daily spend or a lifetime amount.
Schedule
- Ads can run continuously or have a start and end date. Very important to limit the date range if you have ads for events or other time sensitive items.
Creating your ads
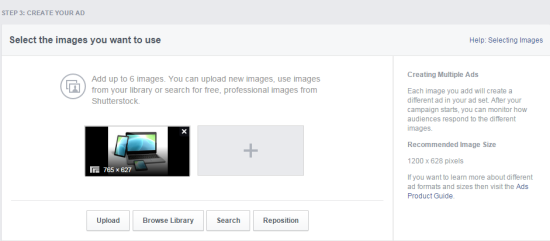
The final step in starting an ad campaign is to create your ads. You are able to select up to 6 images and create multiple ads for each campaign. This will allow you to test how your audience responds to different images.
Choosing your text and links
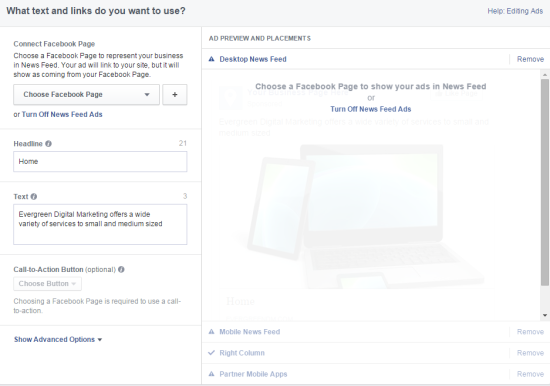
Here you are able to edit your ad text, website links, and placements.
Connect your Facebook page
Choosing to connect a page allows you to represent your organization in the News Feed. Your ads will still link to your website, but they will be shown as coming from your Facebook Page.
Writing your ad copy
- Headline – you are allowed only 25 characters for your headline so be clear and direct.
- Text – with a 90 character limit is important to write compelling text that lets people know what you are promoting and what to expect when they click your ad.
Call-to-action button
- An optional item that can be placed within your ad.
- Taking advantage of this item is recommended as it provides further understanding of what action you would like the user to take.
- Your options for call-to-action buttons are – shop now, book now, learn more, sign up, and download.
Ad preview and placements
- Desktop News Feed and Mobile News Feed ads will show up in the main news feed of the user’s homepage. These areas are the best for placement of your ads. Showing up alongside posts of a user’s friends and pages they like increase the chance your ad will be noticed.
- Right Column ads will show up on the right hand column of the news feed and other areas within Facebook. While you may want to test this placement, typically these ads will perform worse than ads shown in the news feed.
- In this area you will be able to toggle ad placements off and on and testing will show where your ads work best.
- Ad previews are available for each placement so you can ensure your images and text work for each area.
Review and place order
Now that you’ve created your new ad campaign, this is one final review to ensure that everything is set up correctly. If there are changes to be made you can simply click the ‘edit order’ button to go back to the ad creator.
Once you have reviewed your ads and are satisfied with your settings you simply click the ‘place order’ button to proceed. Your ads will be place under ‘in review’. Unless there are sensitive subjects in your ads that process is quick.
Don’t forget to engage your Facebook fans
The focus of this post has been on how to reach your target audience on Facebook through paid advertising. While this has become increasingly important due to the ongoing algorithm changes on Facebook, engaging your fans and potential fans is a crucial aspect of your online presence.
Taking advantage of your ongoing organic reach and supplementing that with well thought out paid campaigns will help you get the most out of your organization’s Facebook page.


 PRINT
PRINT


